Monday 7 May 2007

the finshed product (well nearly)


both humbuckers fitted
pulling the humbucker leads through into the control cavity
the replacement jackplate
the wired control cavity
the pot tips and switch tip through onto the body front


the build 1

the finished body with several coats of lacquer
the body and neck
the neck joint
fitting the neck humbucker


Thursday 3 May 2007

Update

I thought I would just update everyone of my progress at this point in the build as some more parts arrived today. The parts were some felts for the strap buttons. They were meant to arrive with all the other parts but was accidently forgotten. WD music were really good and sent it next day which was much appreciated.

Anyway... At the mo I have pretty much finished the neck and head but i still am going to give it a few more coats to shine it up some more. I read somewhere that brasso is also good for getting a good shine so i might try that.

The body has colour on everyside except the top as i wanted to stain it balck like a prs grey custom. Unfortunatly the top on my kit had a line on it which i tried to remove with the sander but the venneer was soooo thin i went straight through it! bugger! I considered what i could do about it and these were the options:
1) do the top in a solid colour (super glossy black i think)
2) stain the top as planned and cross my fingers
3) stain the top and do a solid 'burst' around the edges to hide the patch-ive not seen a guitar done like this so it may look rubish
4) try and cover it with a graphic of some kind-only prob is it is in a weird place on the guitar and right on an edge

Ill have to think this over some more

I still also have to:
1)get the screws for the neck plate or buy a new neck plate
2)treat the fret board
3) come up with some graphics-i have ben researching modern tatoo style art which i could put on water slide transfer paper like what is used for model planes etc
4)re-wet and dry the body and give it some more colour and lacquer coats
5)on the neck lightly wet and dry and re lacquer


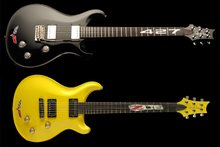
At the mo I have put all the parts on so i can judge how its looking and if it needs anything else. Im think all white graphics.

Tuesday 1 May 2007

New parts


I recently ordered some new parts to add to my build. These include new speed knobs, strap buttons, copper foil, a new square jack socket and some additonal screws.

Painting


1)First I sanded the headstock back to wood by hand so I didnt lose the contours of the neck. I used a really rough to start with and once I had removed the sanding sealer I used really fine wet and dry.

2)Next I masked the sides as I only wanted the top black and the rest blonde. I deliberatly left about a 5mm gap all round so that the spray paint would go over the sides slightly.

3) I bought a can of Halfords grey car primer and sprayed on two coats.

4) I then lightly sanded this with the fine wet and dry paper.

5) I then sprayed on the black (also halfords but this time gloss). I then gave it another coat before sanding with wet and dry.

6) Once I had sufficeint layers of black and it was even I removed the masking tape.

7) Using a new craft knife I scraped the 5mm over hang at the edges so that it was flush with the top.

8) I also re-sanded the sides to make sure they were clean from paint.

9) I the sprayed 1 coat of gloss lacquer (again halfords car paint)and wet and dry again

10) another coat of lacquer

11) clear lacquer the rest fo the neck.

..and hey presto!!!!!!!

The head stock

At the weekend I returned to my parents where I could blag the electric sander and begin work on the headstock. The frst thing I did was to buy new paper for the electric sander, a pack of assorted wet and dry paper, a curved file and some spray paint.

the first task was to design the headstock shape. I got a pencil and drew striaght onto the wood. i spent about an hour trying to get it just right. I decided upon a curve simular to a real PRS but as the sides of the head are different my curve had to be different too. I didnt really want a straight copy anyway.

Next i got a coping saw out and cut along the line I had drawn. I lightly sanded it and then attacked it with the file (curve side) as I wanted a more 3d shape.

Next to painting!!!!!!! hoorah!

Tuesday 24 April 2007

The quality


Overall I have to say I was impressed with the quality of the kit. I had read on the net lots of people saying the same I didnt really believe them. I am a bit of a perfectionist so I do have a few minor comments:

The three way switch is a bit 'clicky'. Im basing my judgements on my Les Paul so I want the same or better quality at least in components. It is a closed box three way where as my Les Paul is an open switchi think I will buy a new switch and solder it in. Doesnt cost much to change.

The knobs are better than I thought they would be but I still would prefer some round black speed knobs like you would get on some PRS, SG's and Les Paul custom models. It is important s these parts are used often on the guitar and can really improve or ruin its overall appearance.

The machineheads seem ok to me. Im going to wait until it is finished and strung to see how good they are and if they need replacing. Many people on the net have said they replaced them straight away pressuming they are rubbish. I dont want to waste money on good ones if these are ok.

Humbuckers and wiring seem solid and I cant flaw them. Im going to cut off the snap joints and solder it so that i wont ever get a loose connection inside. Dont get me wrong the connectors seem good and are well protected in the guitar but im just being a perfectionist again. I am also going to sheild all the cavities of the guitar with copper tape. This will reduce any buzz being picked up by the pickups from unwanted sourced such as tv's etc. Think this is just a good idea to always do. It cant hurt!

Body-im pleased with it. It does have a ton of sanding sealer on at the mo but I expected that. The top seems really nice. Im quite excited about doing something with that.

Neck and fret board-again spot on. No complaints at all. I was really worried about the quality as the kit was so cheap but it seems good to me.

Monday 23 April 2007

The dry run


As many people on the net have advised-I have decided to put the guitar together to test it out. Nothing to do with the fact that I wont have chance to work on it for at least a fortnight and Im too much of a big kid.

I also wanted to make sure all the parts fit, arent damaged and that I have them all. I thought this was wise as the little plastic bags that contained the parts in the box had ripped so the parts were loose.

I began by laying out the parts on the floor. I layed the bushings for the machineheads next to each one and all the relevant screws next to each part. Luckily all the major components were there but I was missing several screws. To determine which ones went where I assembled the guitar as far as I could.

I ended up missing all the screws (3) for the truss rod cover, one for the back plate to the control cavity, and all of the screws(4)for the neck plate-making the assembly a little hard to do!

I did slot the neck in and it is a tight fit. All the parts fit fine with exception of the cavity cover which is too big. That will be easily resolved as it is just a thin piece of acrylic which i can sand down or re-cut once I have applied all the paint.

The kit


The kit I ordered is a PRS style double cutaway guitar. It has twin chrome covered humbuckers, one three way switch (les paul style), one volume knob and one tone.

The guitar also has a stop tail and bridge unit also like that found on a les paul, a paddle style headstock with 3x3 machine heads, 23 fret flat neck.

The body is made of bass wood with a flamed maple top. The neck is made of maple with a rosewood fret board.

Introduction

For ages and ages now I have been obsessed with guitars. I am not a brilliant guitarist but i make up for my lack of skill with enthusiasm!

The truth is I am probabily more interested in the guitars themselves. I am currently training to be an architect and so I have an interest in how things are put together and the design of objects. This in combination with playing the guiatr led me to deciding I would like to make one.

I heard about guitar kits ages ago when I was reading a guiat mag and decided to look up some parts that i had seen advertised just for the sake of it. I thought it sounded like a brilliant idea especially as I did not have a workshop to cut all the wood etc. Though I would love to do that aswell.

I searced the net for ages trying to find these kits-but with no luck. Instead I resorted to buying a guitar building book by Melvyn Hiscock to see how much would actually be involved if I were to make one from nothing. The answer is alot! Gutted!

Eventually I stumbled across 'the music king' website that were taking back orders so i jumped at the chance. Incidentally I also found they were the cheapest that I could find in the uk for the same kits.

I was a bit worried it would take ages to arive but I was surprised today to have a nice big box in my lounge! Impressed! So to encourage others and to maybe help others by learning from my mistakes i decided upon blogging my progress.

And thus begin'th the blog.....